Bolex H16 User
For Practical Bolex H16 Filming
400ft Breakdown
Introduction
This page discusses breaking down film from a 400ft core onto 4x 100ft Spools. Why would you need to do this when 100ft lengths on camera spools have always been available from Manufacturers like Kodak? For me the only time I usually use this procedure is when I'm either offered or find a bulk buy of film at a price i simply cannot refuse and that usually will be 400ft canned lengths and yet I don't want to have to shoot it at length by bulking up my camera by putting it in a 400ft magazine and attach a motor to my camera which makes everything really heavy.
Its true there is a monetary difference when comparing the standard RRP prices of what appears to be the same length of film supplied via a 400ft core in a can and 4x 100ft lengths on spools in boxes so you may feel that you could save some extra ££ by always ordering the 400ft length and breaking it down.
Reasons why this isn't always a good idea
1) You will always get precisely the same length of film on each 100ft spool that a manufacturer makes. When you break film down there is no way of accurately loading in the dark each of the 4 spools with the same amount of film and generally the first 3 spools will be overloaded while the last one won't. Which makes telling precisely when your going to run out when using self made spools that much more difficult.
2) Kodak gives you actually 115ft per 100ft roll with the extra 15ft there for you to load your camera with. You should be able to load your Bolex camera in about 3ft of film so your actually getting some extra film for free. The actual total works out at 60ft of extra film which you won't get with the 400ft core.
3) Its easier when using a Bolex camera spring wound to have boxes of 100ft spools available as they are so much neater to use and you really want to support the manufacturers so they continue to make the smaller more non professional but practical sizes.
4) Despite me not having any issues with film I've loaded this way there is the potential to introduce extra dust or dirt onto the film with this extra step prior to shooting if your not careful.
Feel the Fear and do it anyway
So despite these caveats you have 400ft of film you want to break down whats the best practical way of achieving it? I originally wrote this up as a forum posting for Cinematography.com as I happened to stumble on a guy asking the same questions i asked before I figured it out as he was being told all kinds of weird and wacky advice such as to turn a room in his house into a dark room and also order some night vision binoculars to see what he was doing.
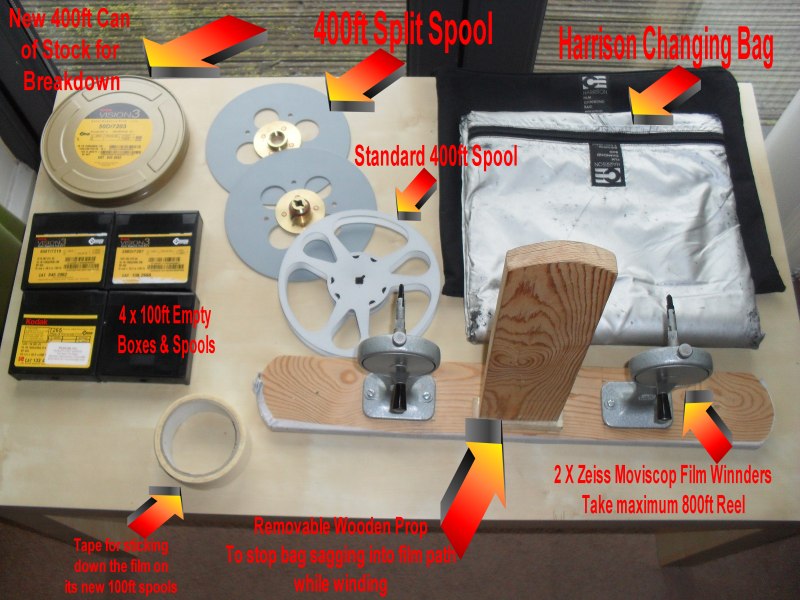
Thankfully you don't need to do either and you can use film items that you can use outside of just breaking down a film. So we'll start with a picture as it will help describe the procedure and all the bits you'll need.

I already owned a changing bag which is always a practical item to own anyway which should be in most shooters kit bag. If you haven't got one to load a camera or mag in total darkness I'd recommend it. Next item on the list is a standard 400ft reel which you should be able to pick up for next to nothing. A 400ft split spool might be a bit more expensive but i find it also useful getting prints onto projection reels from cores and managing the moving of shot film in and out of cans / projection reels.
To move that film on those reels you'll need some small film winders that handle a reel no bigger than 800ft, my Zeiss ones are perfect any bigger and they won't fit in the changing bag. For nothing at all you can make the wooden base you see in the picture to hold the winders and a bit of wood that sticks up to hold the bag up when winding. Next grab some spare 100ft boxes from a lab that’s quiet happy for you to have them for nothing and make sure you ask for em back every time you send film to them for processing.

Procedure:-
1) Put everything into the bag, zip up, put your arms into the bag and untape the 400ft can and stick its tape along the sides of the wood stand.
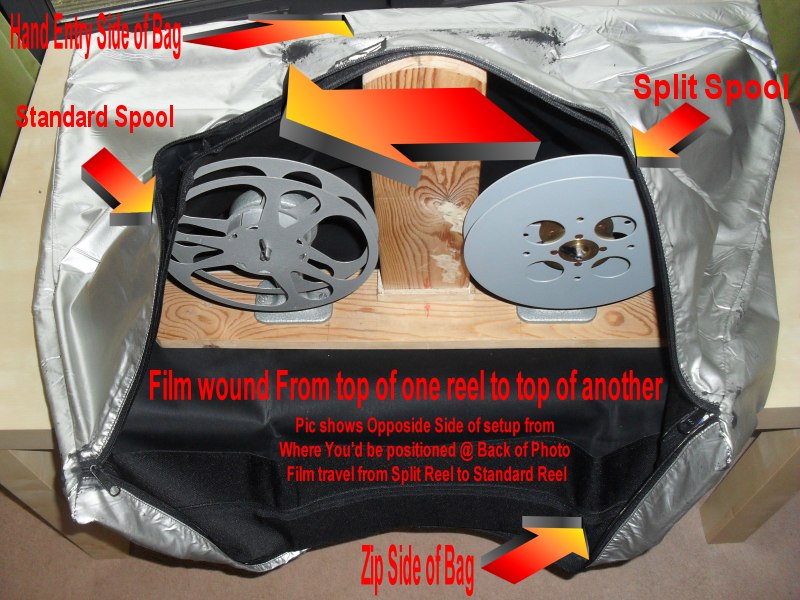
2) Take film out the can and its plastic bag and put on the split spool and connect together both sides of the split spool and put the split spool on the left winder and put the empty standard 400ft reel on the right winder.
3) Unpick the tape holding the film, reposition upside down if film not coming off top right of the split spool and move film across to top right of empty standard reel and start winding clockwise all 400ft from split spool onto standard reel.
BY DOING THIS THE "B" WINDING ORITENTATED FILM IS TURNED INTO "A" WINDING FILM WHEN ON THE STANDARD REEL
4) Remove split spool from left winder and put somewhere safe in the bag its task done and move standard reel with all film on it now from right to left winder put 100ft empty spool on right winder make sure again film comes off top right from standard reel and goes to top right of 100ft spool and wind 100ft or more as desired onto 100ft spool. Once you have the 100ft reel full you can usually break all non estar base film by just folding and pulling it apart No knife or cutter required.
THAT 100FT SPOOL WILL HAVE THE FILM BACK IN B WINDING ORIENTATION READY TO SHOOT
5) Stick tape on film on 100ft spool otherwise it will unfurled put in plastic tray in box and tape 100ft box up. Repeat for next 3 100ft spools.
![]() I have used this setup around 15+ times now! When I first used it I thought it might introduce dust and dirt onto the film but comparing Kodak 100ft loads with my own creations after processing and Scanning no discernible difference was seen so I’ve kept doing it! Make sure bag and everything you put in it is spotless and you'll be fine. It also doesn't make any difference at what speed i wind the film at as there was some discussion about static maybe being created while winding the film that may fog it but again nothing was noticed on the scans i got back.
I have used this setup around 15+ times now! When I first used it I thought it might introduce dust and dirt onto the film but comparing Kodak 100ft loads with my own creations after processing and Scanning no discernible difference was seen so I’ve kept doing it! Make sure bag and everything you put in it is spotless and you'll be fine. It also doesn't make any difference at what speed i wind the film at as there was some discussion about static maybe being created while winding the film that may fog it but again nothing was noticed on the scans i got back.